Reavers!
Figures by Sergeant Major Miniatures
Monday, October 10, 2011
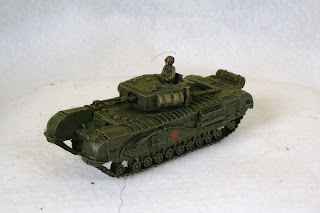
Commie Armor to Battle the Nazi Menace
Finished the batch of Soviet Armor. Churchills, T-34s, and since no one
makes a Soviet 37mm AA gun, I have French 25's standing in. All 15mm
Quality Casting miniatures.
 |
And it looks like I need to clean the camera lens or ccd. . .
Saturday, October 1, 2011
Armor To The Front
Here is the armor with blackwash (black ink, 50/50 Future/water) applied. Next is detailing and camo.
Friday, September 30, 2011
Monday, June 27, 2011
Fallschirmjager Regiment Ready for Duty
The Fallschirmjager Regiment, specifically the 2nd Regiment of the 7th Fleiger Division, circa May 1941 (Crete) is ready for action.
Figures are 15mm, based for Command Decision-Test of Battle, mostly Quality Castings with some Old Glory and Peter Pig as fillers. Photos show the regimental HQ, three para battalions, 13th (IG) and 14th (AT) companies, MG Company from the divisional MG Battalion and artillery battery from the artillery regiment.
Figures are 15mm, based for Command Decision-Test of Battle, mostly Quality Castings with some Old Glory and Peter Pig as fillers. Photos show the regimental HQ, three para battalions, 13th (IG) and 14th (AT) companies, MG Company from the divisional MG Battalion and artillery battery from the artillery regiment.
Friday, June 17, 2011
Fallschirmjager Regiment Project
I've been meaning to create a German para Regiment and since a friend, Jake Strangeway, is putting together a large Battle for Crete project for Historicon 2012, I thought I'd start my project and use the regiment in the Battle for Crete.
15mm Quality Castings minis arrived today so I've started filing the buggers, gluing them on pospsicle sticks and priming. Color scheme will be green-grey smock and field grey trousers and helmet. Pictures as I get some finished.
As of the 22nd, I have about a 1/3rd of the regiment painted and some elements based. Things are progressing well.
Whitewashed Shermans
So I've decided I have enough "summer" WWII stuff in 15mm so now I'm going to start painting minis for "winter". For vehicles that means whitewashes. This is my first whitewash. To start with I painted the Shermans in Olive Drab and detailed the improvised sandbag armor. I applied decals and then masked them with frisket. Next I thinned down white paint to a milky consistency and applied that over the hull and turret. I repeated this twice more after each application dried. Then I applied a black wash (50/50 water/future floor polish with a few drops of black ink). When that dried, using a small, worn out brush I scrubbed on white paint to highlight the white wash some. Then, with the Olive Drab and a stiff brush, I "stippled" on some olive drab to represent the corners and areas where the white wash has rubbed off with campaign wear and tear. "Stippling" in my case means taking the stiff brush wet with olive drab paint and punching it onto the hull and turret leaving little dots of OD on flat surfaces and at edges. Repeat the white scrub and OD stipple until you get the look you want. Then I removed the masking from the decals, applied matte varnish and hit the model with a khaki/sand color mix as drybrush to highlight again.
After all that, I decided the tracks and running gear needed some mud so I added color to spackling paste and applied with brush and highlighted with lighter mud color after drying.
A busy procedure but I'm satisfied with it as a first attempt. Now I have some armor ready to fight the Bulge!
The minis are Quality Castings 15mm Shermans.
Saturday, March 5, 2011
British SAS and LRDP
My latest efforts are British SAS and LRDP figures. These are from Artizan's 28mm line. Basing was accomplished with pumice, then completely covered in fine-screened aquarium rocks. When that dried, I applied a watery umber coating, followed by watered down PVA. When all that dried, I drybrushed with Vallejo Middlestone, then Dark Sand, then White.
Wednesday, January 12, 2011
Playing Around with a New Camera
So my wife the photographer got a new Canon Rebel T2 and I inherited her old Rebel T1. Still a big jump up for me. I took first set of photos with the new camera. Much better I think. The first photo uses the standard 18-55mm lens and the rest use a 60mm macro lens. I like that macro lens. Unfortunately, it was a loaner and I need to buy my own if I want to use it regularly. Given the large 10+Meg picture sizes, I dropped them all to 640x480 pixels before uploading to this site, so they may lose something on zoom, but in the original photo I can zoom and crop and still have very good resolution. And it looks like I need to adjust the white balance further on some of the images.
Miniatures are 15mm Battle Honors tanks and Resistant Rooster 15mm (really about 18mm) Fallschirmjager.
Miniatures are 15mm Battle Honors tanks and Resistant Rooster 15mm (really about 18mm) Fallschirmjager.
Subscribe to:
Comments (Atom)


